
 |  |  |  |
|---|
Back to Tips and Tricks for PBS and CashPoint
Tips and Tricks #12 - MySet #2
In Tips and Tricks #11 we discussed MySet - a set of user setups and defaults that make PBS screen life much easier. It is both a sub-set of the features of Break-Out and also a super-set, as it does a number of things Break-out never did. MySet is currently a group of three functions allowing you, or the administrator, to control certain aspects of the functionality of your screens. These controls are different than the Custom Menu set up of the PBS system. Most importantly, each user can now have their own individually tailored MySet parameters.
In Tips and Tricks #11 we covered the first of the three functions that MySet allows you to set up. This consisted of setting up certain people to be able to view the master file for their information but prohibiting them from altering it. The set up for this View-only functionality requires administrator access.
The next MySet function - the List-box sort - allows a user to determine, screen by screen, what column and what sort sequence the Look-up will use. Depending on your function and knowledge of the system, your use of the various Look-ups may differ from that of your colleagues. For example, the AP Clerk may be very familiar with the Vendor ID’s assigned to suppliers and prefer to look up the vendors by Vendor ID. The CFO however, may prefer to look up vendors by name. This function allows you to setup each user and each Lookup with a specific Look-up column (e.g. Vendor ID versus Vendor name) and a default sort order, making these settings unique for each user.
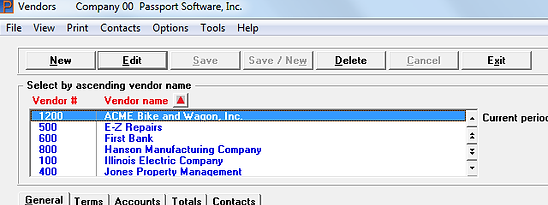
Using the Vendor Maintenance screen below, we see that by default the sorted column is the Vendor Name and the sort sequence is the Vendor Name ascending. The small triangular arrow head (in red) indicates that this column is the sorted column and that the sort sequence is “up” i.e. the data is sorted in ascending sequence.
Clicking the column heading or the arrow head reverses the sequence so that the data is now in descending sequence and, of course, the arrow head points down.
A temporary change to the List column and its sequence has now been made. This column/sequence will continue to be used while you remain in the screen.
Since any changes in the Lookup sequence have not been saved, when you exit the program and later return to it, the programmed default will be the one you see.
To change the sequence and make it the new default for every time you enter that application, simply select the column you want the List box to be sorted on. As before, click on the up or down arrow if you want to change the sort direction. While the (new) temporary List column/sequnce is active, go to the help function at the top of the screen and click on the “MySet (List-box sort)” or type Ctl_F8.
This will toggle the check mark at the beginning of the line and indicates that the current column/sequence selection is the default and will automatically be the one used every time you enter the application.
If you click the MySet List box sort line again, you will cycle the toggle off.
As long as the check mark is on that line, the list-box column and sequence you selected will remain in place. Once you untoggle the check mark, the system specified default returns.
Note also that you have set a default and must unset it and then reset it to change the default. This is because to keep the flexibility in the column selection and sort options (even while operating under a customized default column/sort sequence) you are allowed to change the column and sequence to something else. Your selected default will return as soon as you exit the screen and come back into it.
Once you untoggle the check mark the system default returns.
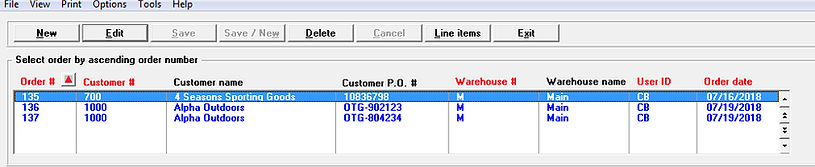
These MySet principles apply equally to any other list box in the system. For example, the Entered Orders List box in OE has 5 columns to choose from:
The same rules apply for all of these.
In Tips & Tricks #13, we will finish the MySet exploration by setting up defaults that will auto fill values into any report that you want.
Back to Tips and Tricks for PBS and CashPoint
.png)
.png)
.png)
.png)